
Truss systems are the backbone of professional stage lighting installations. Whether you’re lighting a concert, theatre production, church service, television studio, conference, exhibition, or outdoor festival, securely mounting stage lights on trusses is essential for safety, reliability, and professional performance.
Improperly installed lighting fixtures can create serious hazards, including falling equipment, damaged fixtures, electrical failures, and injuries to performers, crew members, or audiences. Following industry best practices for rigging and installation helps ensure every lighting system operates safely and efficiently.
This guide explains how to mount stage lights safely on trusses, including equipment selection, installation procedures, safety checks, and common mistakes to avoid.
Why Safe Truss Mounting Is Important
Every lighting fixture suspended above people must be installed correctly.
Safe mounting helps:
- Protect performers and audiences
- Prevent equipment damage
- Reduce liability
- Improve fixture stability
- Simplify maintenance
- Meet workplace safety requirements
- Extend equipment lifespan
- Ensure reliable operation during live events
Safety should always be the first priority during any lighting installation.

Step 1: Choose the Right Truss
Before installing fixtures, confirm that the truss is suitable for the application.
Consider:
- Load capacity
- Truss type (box, triangular, ladder, etc.)
- Span length
- Mounting height
- Indoor or outdoor use
- Permanent or temporary installation
Always verify that the truss can safely support the combined weight of all fixtures, cables, clamps, and accessories.
Step 2: Inspect the Truss
Never install lighting on a damaged truss.
Check for:
- Cracks or dents
- Bent sections
- Corrosion
- Damaged welds
- Loose or missing hardware
- Excessive wear
If any structural damage is found, remove the truss from service until it has been repaired or replaced.
Step 3: Select Certified Mounting Hardware
Use only professional-grade rigging hardware designed for overhead installations.
Common mounting components include:
- Half couplers
- Trigger clamps
- Omega brackets
- Quick-lock brackets
- Load-rated bolts
- Truss adapters
Never use homemade or non-rated hardware for overhead lighting.
Step 4: Attach the Mounting Bracket
Most professional fixtures include a mounting bracket or omega bracket.
When attaching the fixture:
- Secure the bracket firmly.
- Tighten all bolts according to the manufacturer’s specifications.
- Confirm that locking mechanisms are fully engaged.
- Ensure the bracket is compatible with the selected clamp.
Loose mounting brackets can lead to unstable fixtures and increased wear.
Step 5: Install the Clamp
Position the clamp around the truss tube and tighten it securely.
Before tightening:
- Verify the clamp matches the truss tube diameter.
- Ensure the fixture hangs vertically.
- Check that the clamp is fully seated on the truss.
Do not overtighten to the point of damaging the clamp or truss.
Step 6: Attach a Safety Cable
Every overhead lighting fixture should have an independent secondary safety attachment.
Proper safety cable installation:
- Loop the cable around the truss.
- Attach it to the fixture’s designated safety point.
- Keep the cable as short as practical without restricting movement.
- Ensure the cable is load-rated and in good condition.
Never attach the safety cable only to the clamp.
If the clamp fails, the safety cable should prevent the fixture from falling.
Step 7: Balance Fixture Placement
Avoid concentrating heavy fixtures in one area of the truss.
Distribute fixtures evenly to:
- Balance structural loads
- Reduce stress on the truss
- Improve overall stability
- Simplify load calculations
Consider the combined weight of lighting fixtures, speakers, LED screens, and other suspended equipment.
Step 8: Allow Clearance for Moving Fixtures
Moving head lights require sufficient space for full movement.
Provide clearance for:
- Pan rotation
- Tilt movement
- Zoom and focus mechanisms
- Cable movement
- Maintenance access
Ensure neighboring fixtures cannot collide during operation.
Step 9: Manage Cables Properly
Power and data cables should be secured separately from the fixture’s mounting hardware.
Best practices include:
- Route cables neatly along the truss.
- Use hook-and-loop straps or approved cable ties.
- Leave enough slack for moving fixtures.
- Keep cables away from sharp edges and moving parts.
- Clearly label cable runs.
Well-organized cabling improves both safety and maintenance efficiency.
Step 10: Test Every Fixture
After installation, verify that each fixture operates correctly.
Test:
- Power
- DMX or network communication
- Pan and tilt
- Dimming
- Color mixing
- Gobos
- Zoom
- Focus
- Strobe functions
Also confirm that all clamps and safety cables remain secure after testing.
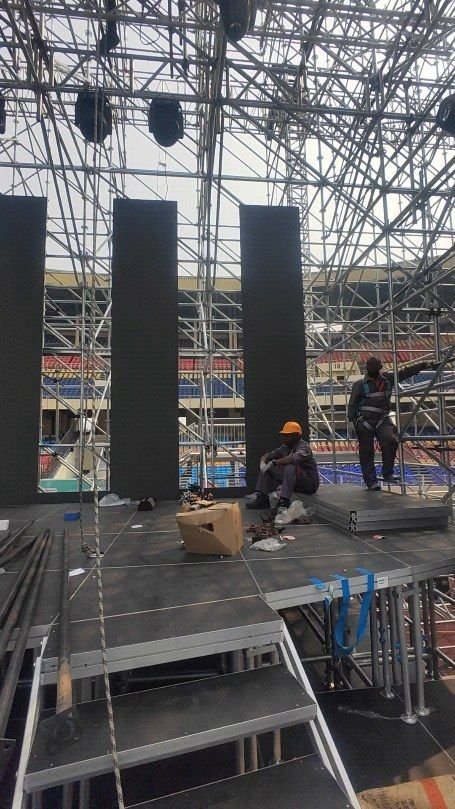
Outdoor Truss Installations
Outdoor events require additional precautions.
Consider:
- Wind loading
- Weather-resistant fixtures
- Corrosion-resistant hardware
- Waterproof connectors
- Ground support stability
- Ballast requirements
- Local weather forecasts
Temporary outdoor structures should always follow engineering recommendations and local safety regulations.
Routine Inspection Checklist
Before every event, inspect:
- Truss condition
- Clamps
- Safety cables
- Mounting brackets
- Bolts and fasteners
- Power cables
- DMX cables
- Fixture alignment
- Load distribution
Regular inspections help identify wear before it becomes a safety risk.
Common Mounting Mistakes
Avoid these common errors:
- Installing fixtures without safety cables
- Using damaged clamps
- Overloading the truss
- Mixing incompatible mounting hardware
- Failing to tighten brackets
- Allowing cables to support fixture weight
- Ignoring load calculations
- Placing fixtures too close together
- Skipping final safety inspections
Attention to detail helps prevent accidents and protects valuable equipment.
Frequently Asked Questions
Is a safety cable required for every stage light?
Yes. Any lighting fixture suspended overhead should be secured with an independent, load-rated safety cable in addition to its primary mounting clamp.
Can any clamp be used on a lighting truss?
No. Clamps must be compatible with the truss tube diameter, rated for the fixture’s weight, and designed specifically for overhead entertainment rigging.
How much weight can a lighting truss support?
The load capacity depends on the truss type, span length, support configuration, and manufacturer’s specifications. Always verify the Working Load Limit (WLL) before installation.
How often should truss-mounted fixtures be inspected?
Visual inspections should be performed before every event, with more detailed inspections included as part of a regular preventive maintenance schedule.
Can moving head lights be mounted close together?
Moving head fixtures require sufficient clearance for full pan and tilt movement. Adequate spacing prevents collisions and allows proper airflow for cooling.
Conclusion
Mounting stage lights safely on trusses requires careful planning, certified rigging hardware, proper load distribution, secure cable management, and thorough inspections. By following industry best practices and never compromising on safety, installers can create reliable lighting systems that perform consistently while protecting people and equipment.
Whether you’re installing lighting for a theatre, concert venue, church, television studio, conference center, exhibition hall, or outdoor festival, safe truss mounting is essential for every successful production.